API 機能の追加
API 機能を追加します。Dynamo DB を直接触れるような GraphQL と、Lambda でシンプルな REST API をつくるパターンがありますが、今回は REST API にします。
なお、GraphQL が気になる方は
Tutorial - Connect API and database to the app - Vue - AWS Amplify Docs https://docs.amplify.aws/start/getting-started/data-model/q/integration/vue/
こちらに、使い方が詳しく載っています。
REST API 機能の追加
amplify api add
コマンドを実行します。
? Select from one of the below mentioned services:
REST を選択して Enter キーを押します。
? Provide a friendly name for your resource to be used as a label for this category in the project:
これは自動でつくられた名前で OK なので、そのまま Enter キーを押します。
? Provide a path (e.g., /book/{isbn}): ‣ /items
API が作られたときの、最初の関数の名前&パスです items のまま Enter キーを押します。
? Provide an AWS Lambda function name: (*)
API を担当する Lambda の名前です。これも自動でつくられた名前で OK なので、そのまま Enter キーを押します。
? Choose the runtime that you want to use: (Use arrow keys)
NodeJS を選択して Enter キーを押します。
? Choose the function template that you want to use: (Use arrow keys)
Serverless ExpressJS function (Integration with API Gateway) を選択して Enter キーを押します。
Do you want to configure advanced settings? (y/N)
Available advanced settings:
- Resource access permissions
- Scheduled recurring invocation
- Lambda layers configuration
- Environment variables configuration
- Secret values configuration

? Do you want to configure advanced settings? (y/N)
いろいろな追加な設定を聞かれますが、今回は N を入力して Enter キーを押します。
? Do you want to edit the local lambda function now? (Y/n)
手元に今回の API の仕組みを持ってくるか聞かれます。
Y を入力して Enter キーを押します。
? Try opening with system-default editor instead? (Y/n)
今回は N を入力して Enter キーを押します。
ローカル PC の Visual Studio Code であればしっかり動作するのですが、Cloud 9 だとうまく開かないので No にしています。ただソースを見るだけですので、今後の作業に差支えはありません。
Successfully added resource amptanakaseigo4a488102 locally.

Next steps:
Check out sample function code generated in <project-dir>/amplify/backend/function/amptanakaseigo4a488102/src
"amplify function build" builds all of your functions currently in the project
"amplify mock function <functionName>" runs your function locally
To access AWS resources outside of this Amplify app, edit the /home/ec2-user/environment/aws-amplify-vite-and-vue3-my-template/amplify/backend/function/amptanakaseigo4a488102/custom-policies.json
"amplify push" builds all of your local backend resources and provisions them in the cloud
"amplify publish" builds all of your local backend and front-end resources (if you added hosting category) and provisions them in the cloud
✅ Succesfully added the Lambda function locally
と、作成されました。
なお、ファイル場所は、<project-dir>/amplify/backend/function/<AWS Lambda function name>/src/app.js が本体です。
? Restrict API access? (Y/n) ‣
これは今回作った items の API の入り口を、認証ユーザーのみで制限するかどうかを聞いています。ハッカソンの観点からも、まずはだれでもアクセス出来たほうが開発しやすいという観点から、「認証ユーザーのみで制限」は「なし」で進めます。
ということで、一旦 N を入力します。
? Do you want to add another path? (y/N) ‣
他に作るパスはないので No を入力します。
✔ Restrict API access? (Y/n) · no
✔ Do you want to add another path? (y/N) · no
✅ Successfully added resource apia8f9f9f4 locally

✅ Some next steps:
"amplify push" will build all your local backend resources and provision it in the cloud
"amplify publish" will build all your local backend and frontend resources (if you have hosting category added) and provision it in the cloud
このように表示され、設定が完了しました。
Amplify に設定を反映
現在、ローカルに設定が出来上がっただけですので、内容を反映します。
amplify status
で、状態を確認します。
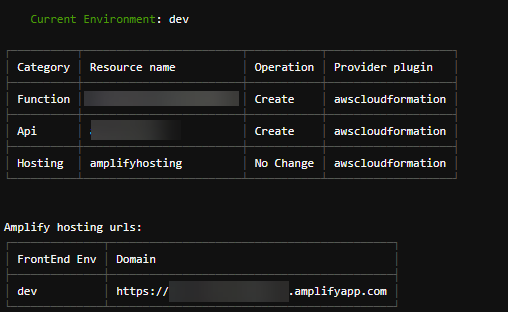
このように API と Function が手元で作成されています。
amplify push
こちらのコマンドを実行して Are you sure you want to continue? は Yes で進めて、クラウドの Amplify に設定を反映します。
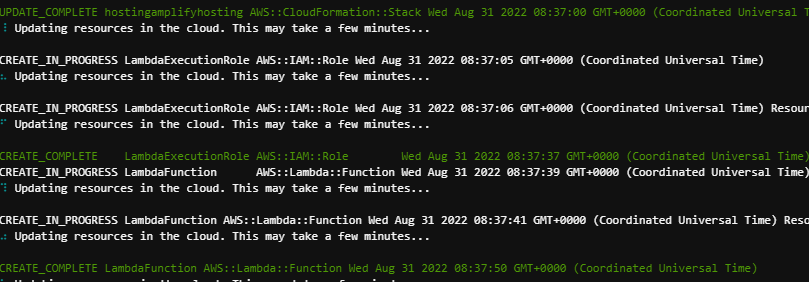
しばらく反映を待ちます。
✔ All resources are updated in the cloud

REST API endpoint: https://***********.execute-api.ap-northeast-1.amazonaws.com/dev
と出たら反映完了です。
API を直接叩いてみる
さきほどの、REST API endpoint ~と書かれた URL が API のエンドポイントです。
今回の /items の URL はこのようになります。
https://***********.execute-api.ap-northeast-1.amazonaws.com/dev/items
*********** の部分はみなさんそれぞれのものになっているので、読み替えてください。
ブラウザでアクセスしてみると
{"success":"get call succeed!","url":"/items"}
と表示されるはずです。
実際のソースを見てみる
さきほども少し触れましたが、このレスポンスを返しているのはファイル場所は、<project-dir>/amplify/backend/function/<AWS Lambda function name>/src/app.js のファイルです。
ファイルツリーから探して開いてみましょう。
/*
Copyright 2017 - 2017 Amazon.com, Inc. or its affiliates. All Rights Reserved.
Licensed under the Apache License, Version 2.0 (the "License"). You may not use this file except in compliance with the License. A copy of the License is located at
    http://aws.amazon.com/apache2.0/
or in the "license" file accompanying this file. This file is distributed on an "AS IS" BASIS, WITHOUT WARRANTIES OR CONDITIONS OF ANY KIND, either express or implied.
See the License for the specific language governing permissions and limitations under the License.
*/


const express = require('express')
const bodyParser = require('body-parser')
const awsServerlessExpressMiddleware = require('aws-serverless-express/middleware')

// declare a new express app
const app = express()
app.use(bodyParser.json())
app.use(awsServerlessExpressMiddleware.eventContext())

// Enable CORS for all methods
app.use(function(req, res, next) {
  res.header("Access-Control-Allow-Origin", "*")
  res.header("Access-Control-Allow-Headers", "*")
  next()
});


/**********************
 * Example get method *
 **********************/

app.get('/items', function(req, res) {
  // Add your code here
  res.json({success: 'get call succeed!', url: req.url});
});

app.get('/items/*', function(req, res) {
  // Add your code here
  res.json({success: 'get call succeed!', url: req.url});
});

/****************************
* Example post method *
****************************/

app.post('/items', function(req, res) {
  // Add your code here
  res.json({success: 'post call succeed!', url: req.url, body: req.body})
});

app.post('/items/*', function(req, res) {
  // Add your code here
  res.json({success: 'post call succeed!', url: req.url, body: req.body})
});

/****************************
* Example put method *
****************************/

app.put('/items', function(req, res) {
  // Add your code here
  res.json({success: 'put call succeed!', url: req.url, body: req.body})
});

app.put('/items/*', function(req, res) {
  // Add your code here
  res.json({success: 'put call succeed!', url: req.url, body: req.body})
});

/****************************
* Example delete method *
****************************/

app.delete('/items', function(req, res) {
  // Add your code here
  res.json({success: 'delete call succeed!', url: req.url});
});

app.delete('/items/*', function(req, res) {
  // Add your code here
  res.json({success: 'delete call succeed!', url: req.url});
});

app.listen(3000, function() {
    console.log("App started")
});

// Export the app object. When executing the application local this does nothing. However,
// to port it to AWS Lambda we will create a wrapper around that will load the app from
// this file
module.exports = app
このようなファイルが自動生成されて、Node.js と Express が分かれば編集可能です。
ちょうど、さきほどブラウザアクセスで返答したものは app.get('/items', function(req, res) { あたりに書いてありますね。
また、今後も Amplify コマンドで API のパスを増やすと自動生成できます。
API を表示側から呼び出す
それでは、API を表示側から呼び出してみましょう。引き続き、aws-amplify-vite-and-vue3-my-template フォルダで進めます。
Amplify は API を呼び出す部分も、提供されているライブラリから行います。
API (REST) - Getting started - JavaScript - AWS Amplify Docs https://docs.amplify.aws/lib/restapi/getting-started/q/platform/js/
詳しい使い方はこちらが参考になります。
amplify status で API のリソース名のメモ
この後、つくった API にアクセスするために API のリソース名のメモしておきます。
amplify status
コマンドを実行します。
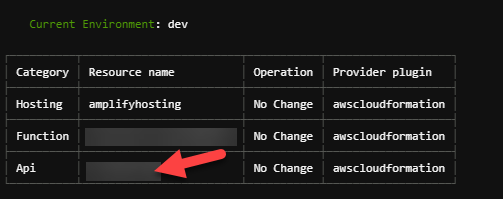
こちらの Api のところの Resource name をメモしておきます。
src/components/HelloWorld.vue を修正
API 関連のモジュールを使えるように準備
src/components/HelloWorld.vue をファイルツリーから開きます。
<script setup>
import { ref } from 'vue'
この部分を、
<script setup>
import { ref } from 'vue'
import { API } from 'aws-amplify';  // API 関連のモジュールを使えるように準備
API を読み込むプログラムを挿入
API を読み込むプログラムを加えます。
const count = ref(0)
この部分を、以下に変更します。
const count = ref(0)

// API 返答後の値を入れるresultAPIオブジェクトを作成
const resultAPI = ref('');

// API /items 読み込み /////

const getAPISample = async () => {
  const apiName = 'apiName';
  const path = '/items';
  const config = { // OPTIONAL
      headers: {}, // OPTIONAL
      response: true, // OPTIONAL (return the entire Axios response object instead of only response.data)
      queryStringParameters: {  // OPTIONAL
          name: 'param',
      },
  };

  let response;
  try {
    response = await API.get(apiName, path, config);
    // 受信成功
    resultAPI.value = response.data.success;
  } catch(error) {
    // 受信エラー
    console.log(error.response);
  }
}

getAPISample();
// API /items 読み込み ここまで /////
に変更します。
HTML 部分の変更
データを受け取った後の値を反映する DOM を作ります。
<template>
  <h1>{{ msg }}</h1>
部分を、
<template>
  <h1>{{ msg }}</h1>
  <h3>{{ resultAPI }}</h3>
リソース名の反映
// API /items 読み込み /////
const apiName = 'apiName';
の apiName に、先ほどメモした自分の API のリソース名を反映します。
たとえば abc12345 の場合は、
// API /items 読み込み /////
const apiName = 'abc12345';
となります。
手元で実行してみる
確認してみましょう。
npm run dev
で手元の開発サーバーを起動して、Preview の操作で見てみましょう。
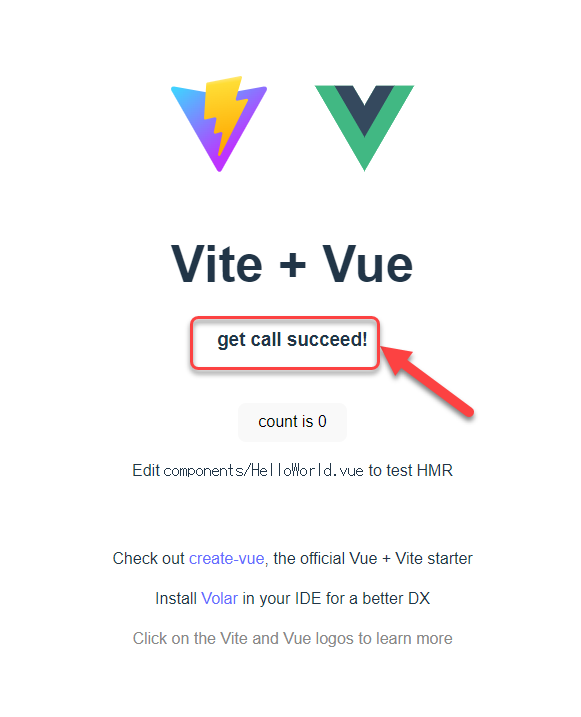
このように、get call succeed! という {"success":"get call succeed!","url":"/items"} の結果から、success の値を取り出したものが表示側に反映されているはずです。